|
The Platoon Robot Example
Introduction
The Platoon project is an enhancement of the simple robot which is depicted in "Getting Started with the Component Language".
Its infrastructure is very much alike, and some components were added to it or modified.
The Platoon demonstrates how several robots with exactly the same program drive in a convoy and respond to unexpected events.
For example - if a robot identifies a block it stops (will cause all robots behind to stop as well), if a robot identifies a large gap to the next robot - it accelerates to fill the gap etc.
Let's see our Platoon experiment with NXT:
Back to top
Building Instructions
The platoon design is similar to the Simple Robot.
It consists of:
1. The basic vehicle - instructions on pages 8-23.
2. Color and Ultrasonic sensors (depicted in photo below).
3. Back barrier (depicted in photo below).
4. Blinking LED (depicted in photo below).
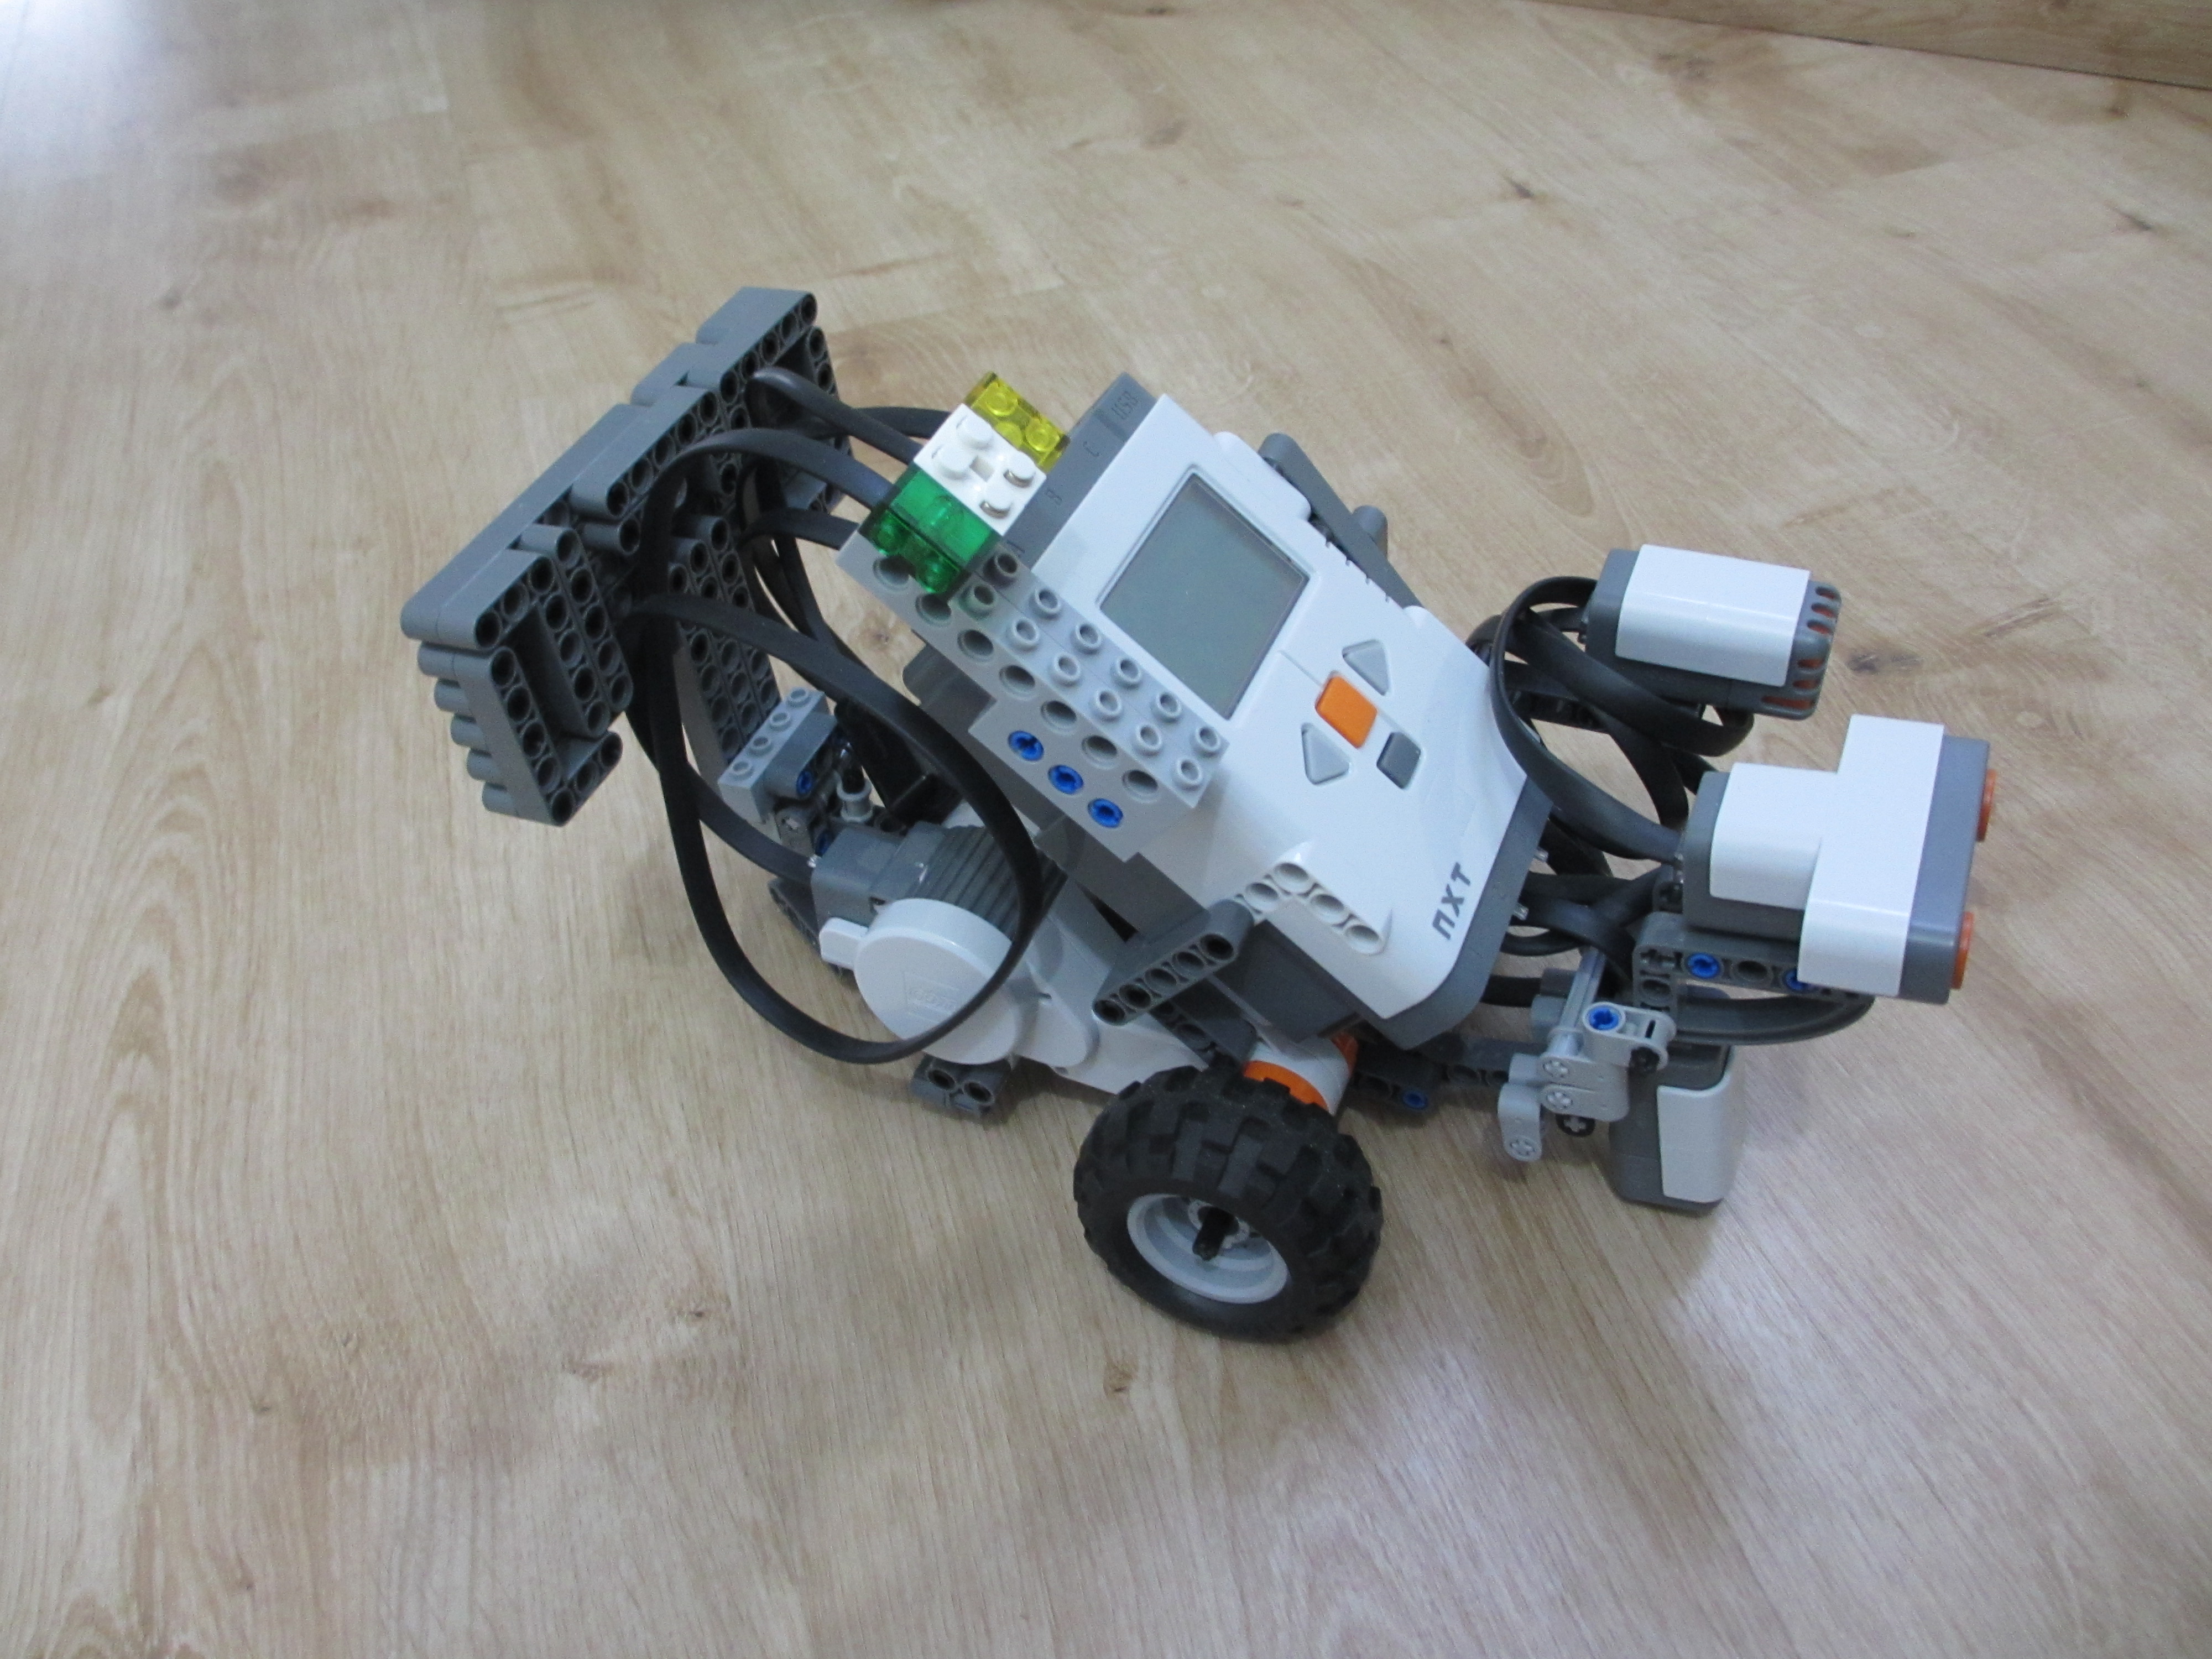 The Platoon with sensors, barrier and LED
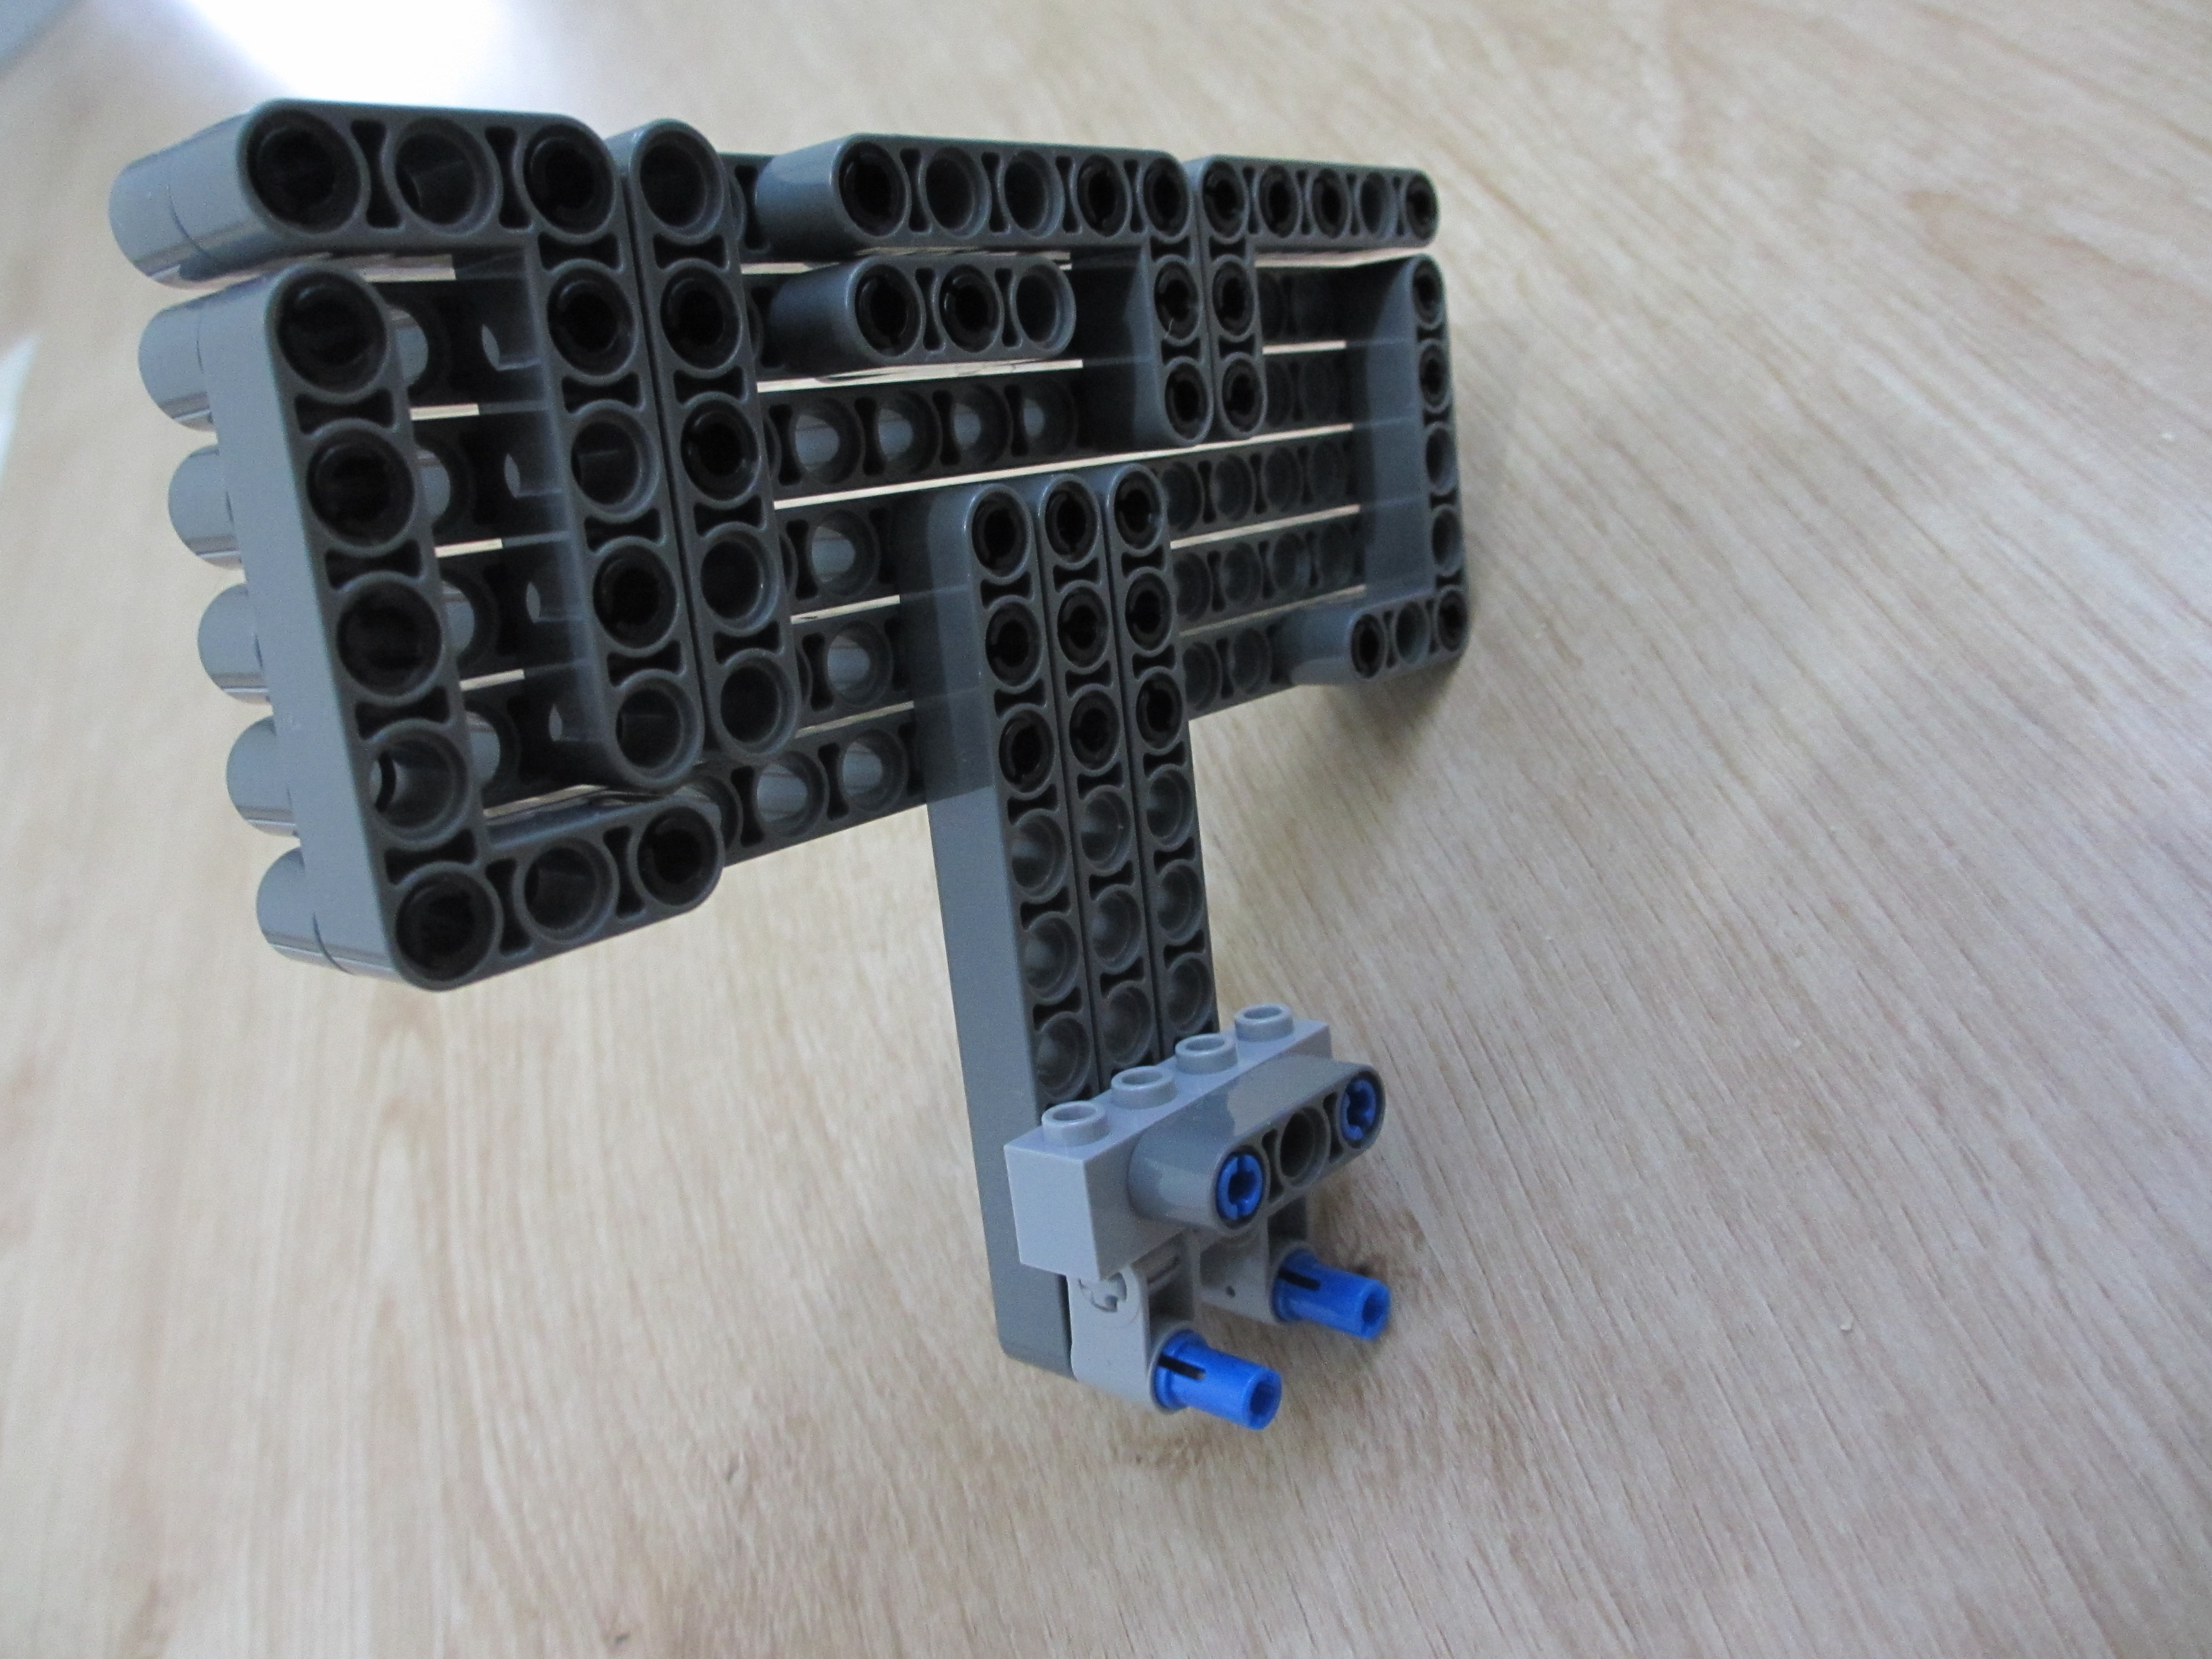 Back Barrier
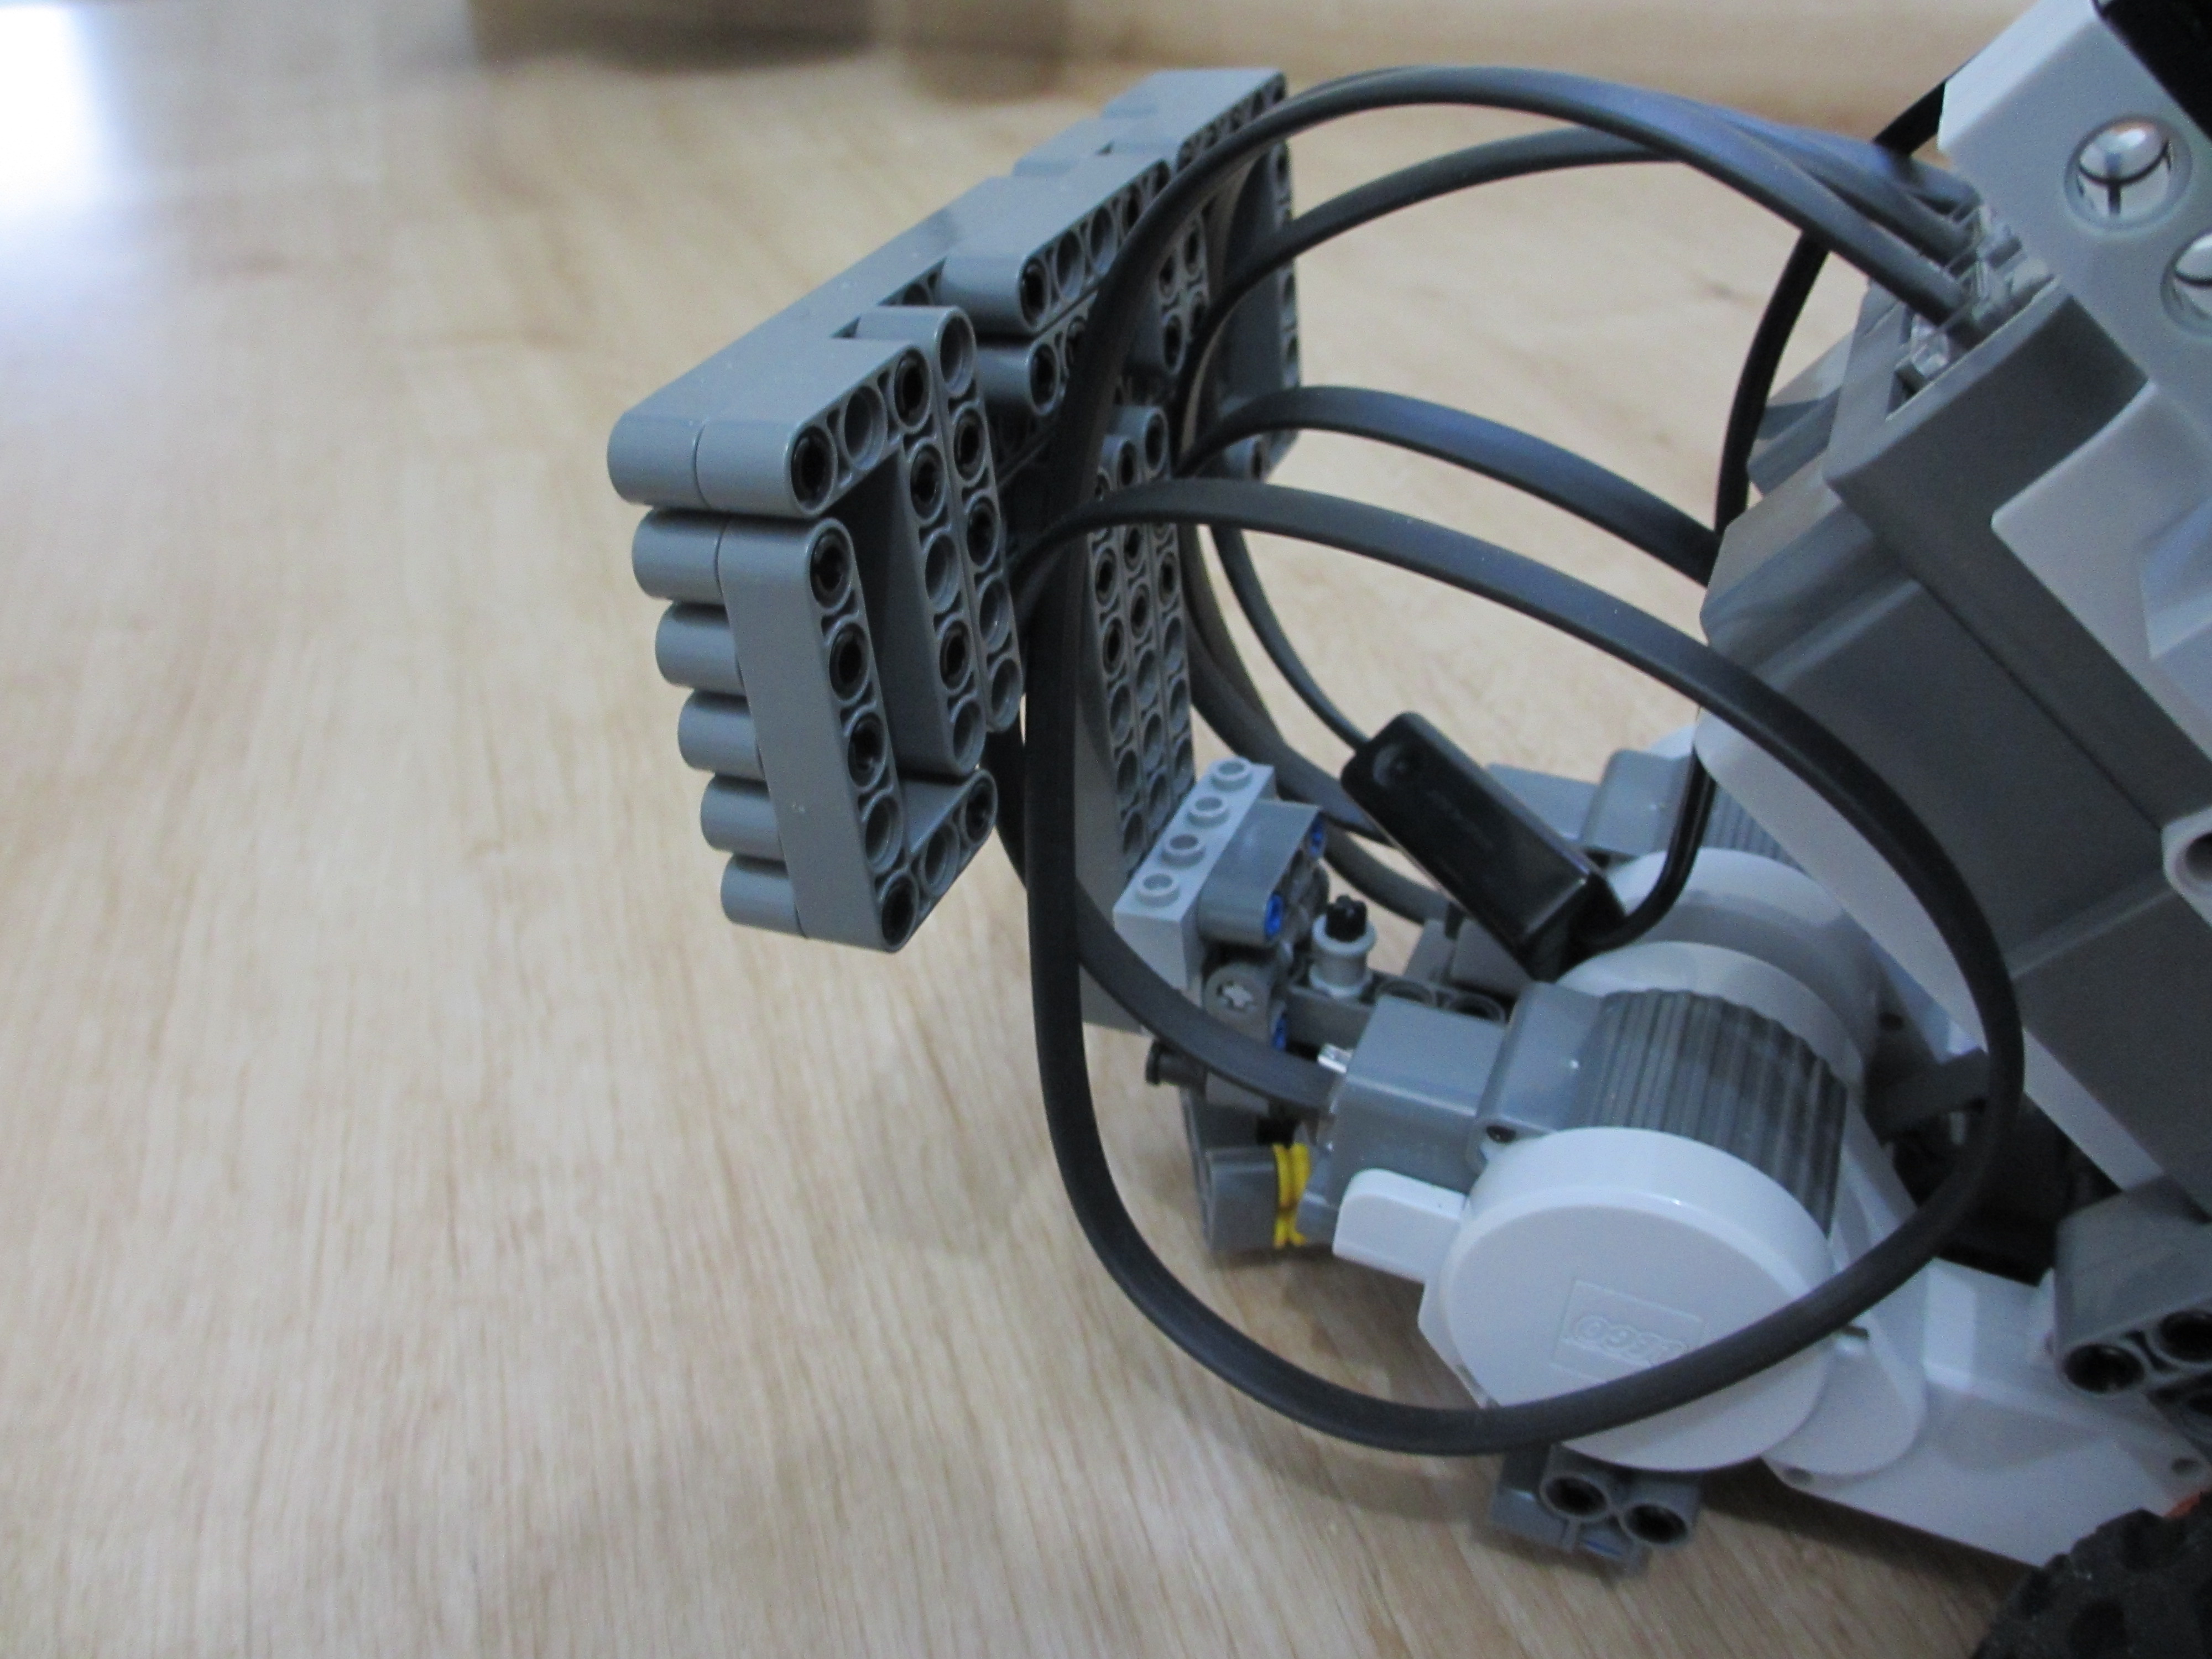 Barrier installed on Platoon
Make sure that:
Left motor is connected to port C.
LED is connected to port B.
Right motor is connected to port A.
Color sensor is connected to port 3.
Ultrasonic sensor is connected to port 4.
Back to top
Platoon
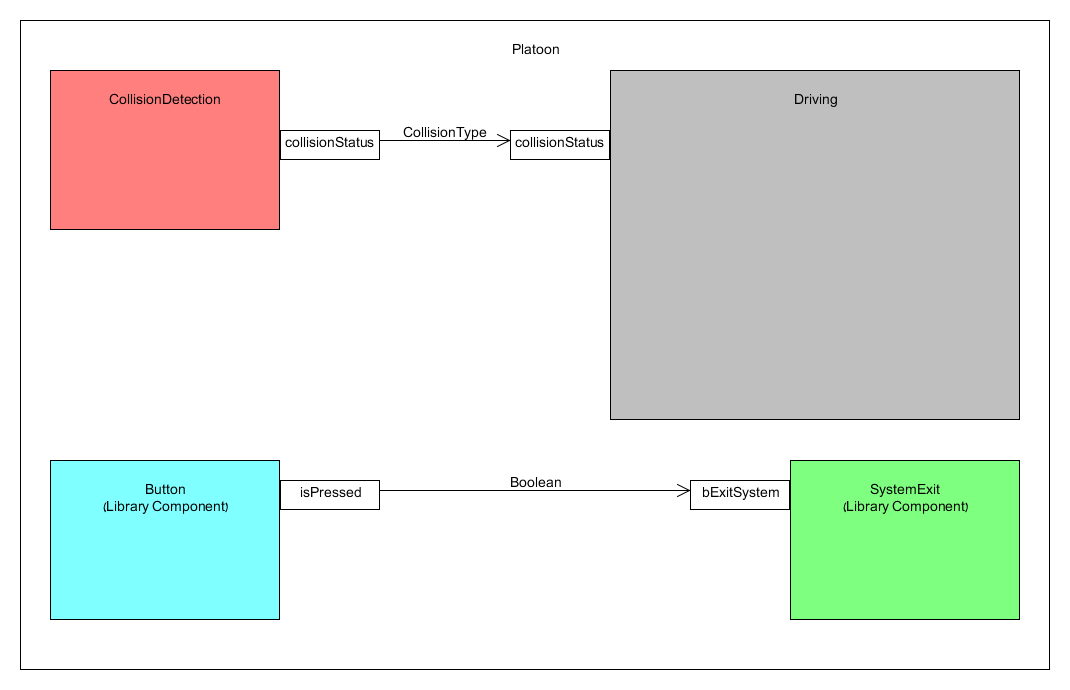
The main component is very similar to the Simple Robot, except for two changes: we removed the TouchSensor component, and changed the Boolean collision port to ENUM of type CollisionType (more details next).
Further explanations were given at the Simple Robot.
Platoon diagram:
Platoon.cmp code:
package Platoon;

import il.ac.tau.cs.smlab.model2lejos.library.wrappers.buttons.Button;
import collisiondetection.CollisionDetection;
import il.ac.tau.cs.smlab.model2lejos.library.components.systemexit.SystemExit;
import driving.Driving;

/**
* Component connecting all needed components for the Platoon
*
* @author Eran Habad
* @version 1.0
*/
<<Deploy>>component Platoon {

	component Button(1)   enterButton;
	component CollisionDetection coldetection;
	component SystemExit   system;
	component Driving drivingcontrol;

	connect enterButton.isPressed    -> system.bExitSystem;
	connect coldetection.collisionStatus -> drivingcontrol.collisionStatus;

}
Back to top
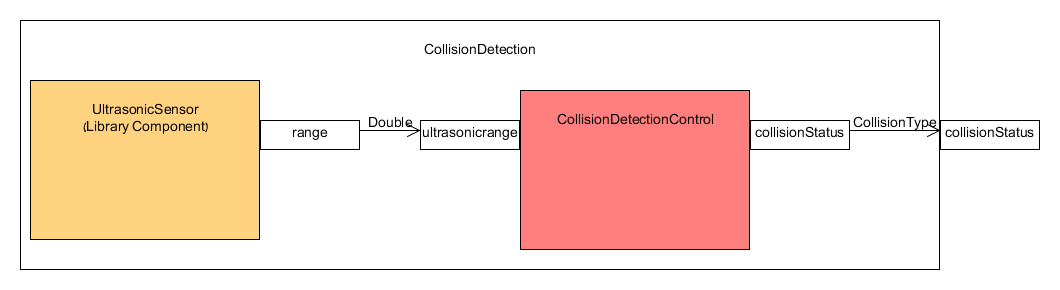
Collision Detection
The component consists of the UltrasonicSensor and the CollisionDetectionControl.
The sensor provides the range to the control, which decides how far is the robot in front of the platoon (out of 4 options - details in CollisionDetectionControl).
Collision Detection Diagram:
CollisionDetection.cmp code:
package collisiondetection;

import il.ac.tau.cs.smlab.model2lejos.library.wrappers.ultrasonicsensor.UltrasonicSensor;
import collisiondetection.types.CollisionType;

/**
* Component responsible of collision detection and connecting sub-components ports
*
* @author Eran Habad
* @version 1.0
*/
component CollisionDetection {

	port
		out		CollisionType		collisionStatus;

	component UltrasonicSensor(lejos.nxt.SensorPort.S4) ultrasonic;
	component CollisionDetectionControl cdc;

	connect cdc.collisionStatus -> collisionStatus;
	connect ultrasonic.range -> cdc.ultrasonicrange;

}
The port CollisionStatus is responsible for telling the driving controller how far is the robot in front of the platoon.
CollisionStatus is of type CollisionType which we implement ourselves as ENUM using the types.cd file.
We use 4 collision statuses:
NEAR - robot detected very close.
NORMAL - robot detected at a normal distance.
FAR - robot detected far away.
CLEAR - the way is clear.
types.cd code:
package collisiondetection;

/**
* Enums for as collision status
**/
classdiagram types {

    enum CollisionType {
		NEAR, NORMAL, FAR, CLEAR;
    }

}
Collision Detection Control
This component is responsible for receiving the range from the ultrasonic sensor and output a status in collisionStatus port as CollisionType type.
CollisionDetectionControl.cmp code:
package collisiondetection;
import collisiondetection.types.CollisionType;

/**
* Component tells how far is the platoon ahead
*
* @author Eran Habad
* @version 1.0
*/
component CollisionDetectionControl {

	port
		in Double ultrasonicrange,
		out CollisionType collisionStatus;

}
Like the SimpleRobot, we implemented this component ourselves using hard coded Java. To do that, we named the file CollisionDetectionControlImpl.java and implemented the compute function.
We imported collisiondetection.types.CollisionType which is the type we created for collisionStatus using the types.cd file.
CollisionDetectionControlImpl.java code:
package collisiondetection;
import collisiondetection.types.CollisionType;

/**
 * Implementation of component CollisionDetectionControl
 * Responsible for determining how far is a robot in front of us (if any), using ultrasonic sensor
 *
 * @author Eran Habad
 * @version 1.0
 */
public class CollisionDetectionControlImpl extends CollisionDetectionControl {

	@Override
	public void compute() {
		if ((this.ultrasonicrange != null)
				&& (this.ultrasonicrange.getCurrentValue() != null)) {
			// Get Values
			double range = this.ultrasonicrange.getCurrentValue();
			if (range<22)
				this.collisionStatus.setNextValue(CollisionType.NEAR); // Collision is near
			else if (range<32)
				this.collisionStatus.setNextValue(CollisionType.NORMAL); // Collision is in sight
			else if (range<100)
				this.collisionStatus.setNextValue(CollisionType.FAR); // Colliision is in sight, but far
			else
				this.collisionStatus.setNextValue(CollisionType.CLEAR); // Way is clear ahead
		}
	}
}
Back to top
Driving
Driving component holds 7 sub components and is responsible for robot's driving as we explain.
ColorSensor reads color from sensor and transfers it to ColorDistinguisher component using a Color port. ColorDistinguisher evaluates color's RGB and outputs current color using the colorNumber port (see ColorDistinguisher for more details).
DrivingControl component receives as an input color from sensor, and collisionStatus from CollisionDetection and determines how to drive the robot.
It outputs to DifferentialPilot how to drive the robot, to LCD what to print on the screen, and to BlinkLEDControl to keep blinking the LED.
Driving diagram:

Driving.cmp Code:
package driving;

import il.ac.tau.cs.smlab.model2lejos.library.wrappers.differentialpilot.DifferentialPilot;
import il.ac.tau.cs.smlab.model2lejos.library.wrappers.lcd.LCD;
import il.ac.tau.cs.smlab.model2lejos.library.wrappers.colorsensor.ColorSensor;
import il.ac.tau.cs.smlab.model2lejos.library.wrappers.colordistinguisher.ColorDistinguisher;
import blinkled.BlinkLEDControl;
import il.ac.tau.cs.smlab.model2lejos.library.wrappers.led.LED;
import collisiondetection.types.CollisionType;

/**
* Component responsible of driving and connecting sub-components ports
*
* @author Eran Habad
* @version 1.0
*/
component Driving {

	port
		in  CollisionType    collisionStatus;

	component DrivingControl controller;
	component DifferentialPilot(2.2, 2.2, lejos.nxt.MotorPort.C, lejos.nxt.MotorPort.A) pilot;
	component LCD lcd;
	component ColorSensor(lejos.nxt.SensorPort.S3) color;
	component ColorDistinguisher colordist;
	component BlinkLEDControl blinker_control;
	component LED(lejos.nxt.MotorPort.B) led;

	// connect driving input ports to driving control input ports
	connect collisionStatus -> controller.collisionStatus;

	// connects ports between driving control and pilot
	connect controller.turnAround -> pilot.bTurn180;
	connect controller.leftTurn -> pilot.bTurn90Left;
	connect controller.rightTurn -> pilot.bTurn90Right;
	connect controller.general -> pilot.cmd;
	connect controller.distance -> pilot.distance;
	connect controller.rotateSpeed -> pilot.rotateSpeed;
	connect controller.travelSpeed -> pilot.travelSpeed;
	connect controller.speed -> pilot.discrete_speed;

	// connect message port bewteen driving control and LCD
	connect controller.LCDmessage -> lcd.message;

	// connect ports of colors and blinking of LED
	connect color.color -> colordist.color;
	connect colordist.colorNumber -> controller.color;
	connect controller.blinkLED -> blinker_control.blink;
	connect blinker_control.led_on -> led.led_on;

}
Driving Control
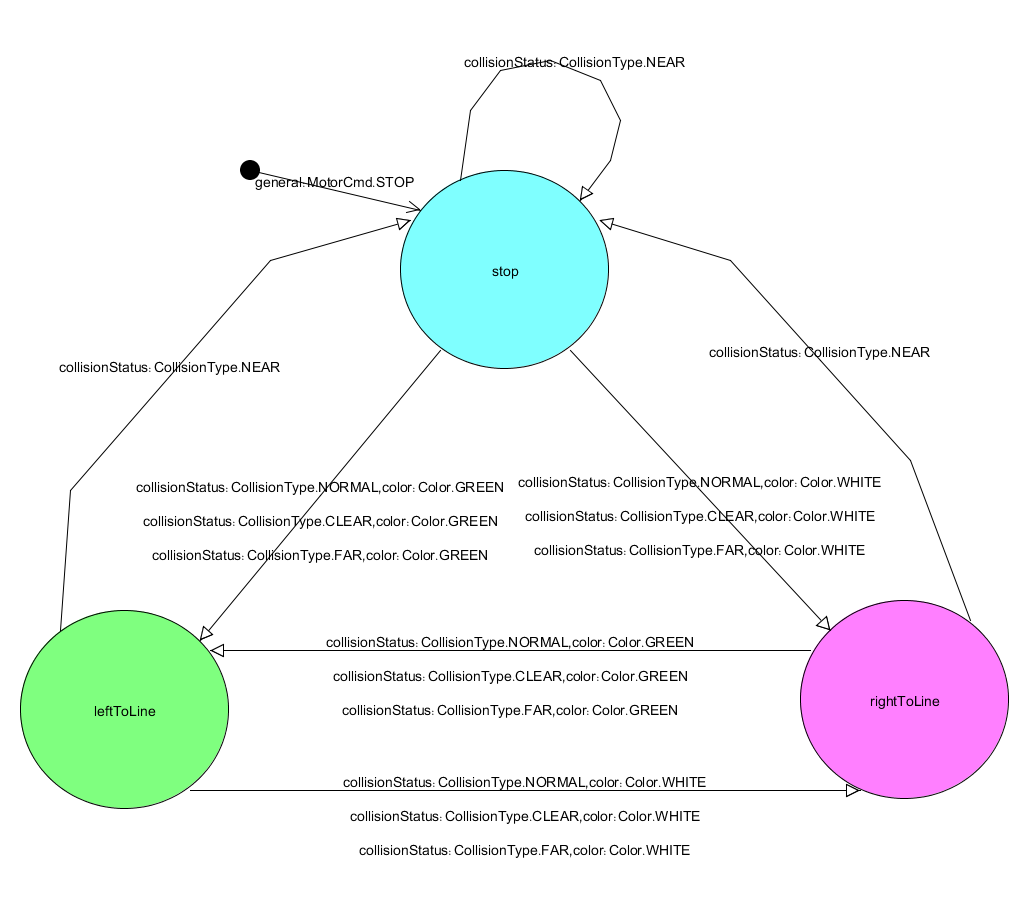
Driving Control is implemented as a state machine and is resposible of robot's driving.
It has three states: stop (initial), leftToLine and rightToLine.
Let's first explain (in simplicity) how the robot moves. The robot drives on a line between surfaces of two colors as you can see in the video.
The idea is to read each cycle the color using the sensor, and to determine whether the robot is right of the line, or left of the line.
If the robot is right of the line we switch to rightToLine state, and steer the robot left towards the line.
If the robot is left of the line we switch to leftToLine state, and steer the robot right towards the line.
While determining how to steer the robot according to color, we also consider the distance from the platoon in front of us (if any) to determine robot's speed.
We declared two vars: fastSpeed and normalSpeed, and set their values to MotorSpeed.SPEED4 and MotorSpeed.SPEED2 accordingly, using the initial actions as we explained in the SimpleRobot.
if collisionStatus is CollisionType.NEAR, the platoon in front of us is too close and we stop.
if collisionStatus is CollisionType.NORMAL, the platoon in front of us is at a normal distance from us, so we set the speed to normalSpeed.
If collisionStatus is CollisionType.CLEAR, we conclude that we are the first robot of the convoy, so we set the speed to normalSpeed.
If collisionStatus is CollisionType.FAR, we identify a platoon far from us, so we set the speed to fastSpeed in order to minimze the gap.
Since the two desicions of steering direction and speed are independent, we need a transition for each ordered pair of color and distance.
Note that if we want the state machine to be full, we need to add some transitions for colors other than the two colors we use.
As implemented now, if the sensor reads some other color, none of the transitions will be taken and the robot might act unexpectedly.
Driving Control Diagram (events only. actions depicted in code below):
DrivingControl.cmp code:
package driving;

import il.ac.tau.cs.smlab.model2lejos.library.wrappers.differentialpilot.types.MotorCmd;
import il.ac.tau.cs.smlab.model2lejos.library.wrappers.differentialpilot.types.MotorSpeed;
import lejos.nxt.ColorSensor.Color;
import collisiondetection.types.CollisionType;
/**
* Component contains the driving state machine
*
* @author Eran Habad
* @version 1.0
*/
component DrivingControl {

port
	in	Boolean		isTouch,
	in	CollisionType	collisionStatus,
	out	Boolean		leftTurn,
	out	Boolean		rightTurn,
	out	Boolean		turnAround,
	out	Double		distance,
	out	MotorCmd	general,
	out	Double		travelSpeed,
	out	Double		rotateSpeed,
	out	String		LCDmessage,
	in	Integer		color,
	out	Boolean		blinkLED,
	out	MotorSpeed	speed;

	var	MotorSpeed	fastSpeed;
	var	MotorSpeed	normalSpeed;

	automaton DrivingControl {
		state
			stop [initial {general:MotorCmd.STOP,blinkLED:true,
				fastSpeed=MotorSpeed.SPEED4,normalSpeed=MotorSpeed.SPEED2}],
				//initial state. engine stop and blink on
			leftToLine,
			rightToLine;

		// transitions from stop state
		stop -> stop   {collisionStatus:CollisionType.NEAR}
				/
				{LCDmessage:"Stop!",general:MotorCmd.STOP,blinkLED:true};

		stop -> rightToLine {collisionStatus:CollisionType.NORMAL,color:Color.WHITE}
				/
				{LCDmessage:"Right to line",general:MotorCmd.STEERLEFT,speed:normalSpeed,blinkLED:true};

		stop -> rightToLine {collisionStatus:CollisionType.CLEAR,color:Color.WHITE}
				/
				{LCDmessage:"Right to line",general:MotorCmd.STEERLEFT,speed:normalSpeed,blinkLED:true};

		stop -> rightToLine {collisionStatus:CollisionType.FAR,color:Color.WHITE}
				/
				{LCDmessage:"Right to line",general:MotorCmd.STEERLEFT,speed:fastSpeed,blinkLED:true};

		stop -> leftToLine {collisionStatus:CollisionType.NORMAL,color:Color.GREEN}
				/
				{LCDmessage:"Left to line",general:MotorCmd.STEERRIGHT,speed:normalSpeed,blinkLED:true};

		stop -> leftToLine {collisionStatus:CollisionType.CLEAR,color:Color.GREEN}
				/
				{LCDmessage:"Left to line",general:MotorCmd.STEERRIGHT,speed:normalSpeed,blinkLED:true};

		stop -> leftToLine {collisionStatus:CollisionType.FAR,color:Color.GREEN}
				/
				{LCDmessage:"Left to line",general:MotorCmd.STEERRIGHT,speed:fastSpeed,blinkLED:true};

        // transitions from rightToLine state
		rightToLine -> stop {collisionStatus:CollisionType.NEAR}
				/
				{LCDmessage:"Stop!",general:MotorCmd.STOP,blinkLED:true};

		rightToLine -> leftToLine {collisionStatus:CollisionType.NORMAL,color:Color.GREEN}
				/
				{LCDmessage:"Left to line",general:MotorCmd.STEERRIGHT,speed:normalSpeed,blinkLED:true};

		rightToLine -> leftToLine {collisionStatus:CollisionType.CLEAR,color:Color.GREEN}
				/
				{LCDmessage:"Left to line",general:MotorCmd.STEERRIGHT,speed:normalSpeed,blinkLED:true};


		rightToLine -> leftToLine {collisionStatus:CollisionType.FAR,color:Color.GREEN}
				/
				{LCDmessage:"Left to line",general:MotorCmd.STEERRIGHT,speed:fastSpeed,blinkLED:true};


		// transitions from leftToLine state
		leftToLine -> stop {collisionStatus:CollisionType.NEAR}
				/
				{LCDmessage:"Stop!",general:MotorCmd.STOP,blinkLED:true};

		leftToLine -> rightToLine {collisionStatus:CollisionType.NORMAL,color:Color.WHITE}
				/
				{LCDmessage:"Right to line",general:MotorCmd.STEERLEFT,speed:normalSpeed,blinkLED:true};

		leftToLine -> rightToLine {collisionStatus:CollisionType.CLEAR,color:Color.WHITE}
				/
				{LCDmessage:"Right to line",general:MotorCmd.STEERLEFT,speed:normalSpeed,blinkLED:true};

		leftToLine -> rightToLine {collisionStatus:CollisionType.FAR,color:Color.WHITE}
				/
				{LCDmessage:"Right to line",general:MotorCmd.STEERLEFT,speed:fastSpeed,blinkLED:true};


		}
}
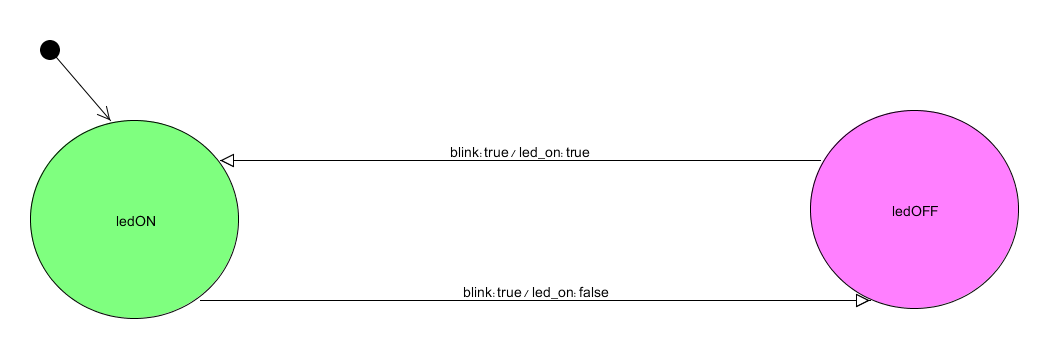
Blink LED Control
The Blink LED Control component is resposible of the flashing light (Kojak) on the platoon.
It has two ports:
'blink' is a boolean input port from DrivingControl component that signals whether to blink or not: 'true' means blink, 'false' means don't blink - stay steady.
'led_on' is a boolean output port to LED component that signals whether to turn ON (in case it's 'true') or OFF (case 'false') the LED. LED component will receive this signal and turn the LED on and off using NXJ commands.
This component is implemented as a state machine with two states: ledOFF (initial), and ledON.
The transition from one state to another depends only on the 'blink' port, which means that as long as 'blink' is 'true', every cycle the current state will flip from ledOFF to ledON to ledOFF and so forth.
Blink LED Control Diagram:
BlinkLEDControl.cmp code:
package blinkled;

/**
* Component responsible of blinking led
*
* @author Eran Habad
* @version 1.0
*/
component BlinkLEDControl {

	port
		in		Boolean		blink,
		out		Boolean		led_on;

	automaton BlinkLEDControl {
		state
			ledOFF [initial], //initial state.
			ledON;

		ledON -> ledOFF   {blink:true} / {led_on:false};

		ledOFF -> ledON  {blink:true} / {led_on:true};
	}


}
Back to top
Download Platoon Files
You can download the files of the Platoon from this link for your own convenience.
Back to top
|