|
Getting Started with the Component Language
Introduction
The goal of this document is to introduce you with the component language, by showing some code and explanations of a simple robot.
The component language is a quick and easy way to program a LEGO MINDSTORMS NXT ® robot.
First, we briefly explain the idea behind the language and how it is used for this matter.
We define a "port" as a logical channel of information, and a "component" as a part of the robot, or the robot itself.
Components can communicate with each other using ports that are connected between them.
A component can contain other components (for example: the whole robot is a component and contains all components).
In that case, the component is responsible of connecting all ports between its sub-components.
Each component is defined in its own .cmp file (cmp is for component).
The cmp file describes the component fully and (may) consist of the following information:
1. Java declerations (package, imports etc.).
2. Component's name.
3. A list of incoming and outgoing ports of the component.
4. A list of variables that are being used in the component.
5. Automaton which describes the behavior of the component as a finite state machine.
6. A list of sub-components.
7. Connections of ports of sub-components, and connections of outgiong ports of sub-components ports to outgoing ports of component (details later).
Rather than the name of the component, every other information is optional
We will see plenty of cmp files in this documentation, as well as a formal EBNF syntax.
We provide you a library with some basic components that we already implemented for you, including components for reading the sensors and controling the motors. The library is fully documented.
Back to top
How does it work?
After building all necessary cmp files for the robot to work, a compiler which we built compiles the cmp files and creates equivalent java files.
The cmp files could be divided to sub-folders, and the compiler creates equivalent folder for the java files with same sub folders and places each java file at the same sub-folder as its cmp file was.
These (java) files are then compiled to a single nxj file which is uploaded to the NXT brick that executes it.
The design we chose to implement for the robot is working in cycles, recursively - as we now explain.
Each cycle we call two functions of the component that represents the whole robot - compute and update.
These functions do their job first (as we soon explain), and then recursively call compute and update functions of all sub-components of the component.
That way - in a single cycle of the robot, every component executes its compute function, as well as its update function.
Compute function
Compute function is usually implemented as a finite state automaton, but can sometimes be implemented as a hard-coded Java if there's a special need (we'll get to that later).
In either case, its main purpose of the compute function is to implement the behavior of the component.
To do so, it samples the current values of the ports and the variables of the component, and as a function of the current state (if using a state machine) does:
1. Take actions, i.e. stopping the motor, accelerate speed etc.
2. Set new values for the outgoing ports and the variables of the component.
3. Move to next state (if using a state machine).
Now, it calls the compute function of every sub-components of the component, and eventually all components of the robot execute their compute function.
An important note, is that any changes being made by the compute function, will be held only in the NEXT cycle.
Update function
The update function of the main component (the root of the robot) is being called after all compute functions are done.
Its goal is simple and derives from its name, and that is to update the values of the ports to the ones that compute functions has determined.
Just like the compute function, the update function calls recursively the update functions of the sub-components.
Now that we know the component language in general lines, it's time to see some code.
Back to top
Simple Robot
The simple robot is an example of programming the LEGO MINDSTORMS NXT ® with the component language.
The behavior of the robot is simple: it drives forward till the ultrasonic sensor detects a nearby object ahead. Then, it turns and start driving backwards till it detects that its touch sensor is touched (means collision) and it starts driving forward. This behavior continues all over again, until the Enter button is pressed and the robot stopps and the system exists.
We will see how to build this robot step by step by showing and explaining code, diagrams and some lego instructions.
Building the robot
This link contains building instructions for the simple robot, which takes about an hour to build.
Our robot consists of:
1. The basic vehicle (pages 8-23).
2. Ultrasonic sensor (pages 28-31).
3. Touch sensor (pages 40-45).
Make sure that:
Left motor is connected to port C.
Right motor is connected to port A.
Touch sensor is connected to port 1.
Ultrasonic sensor is connected to port 4.
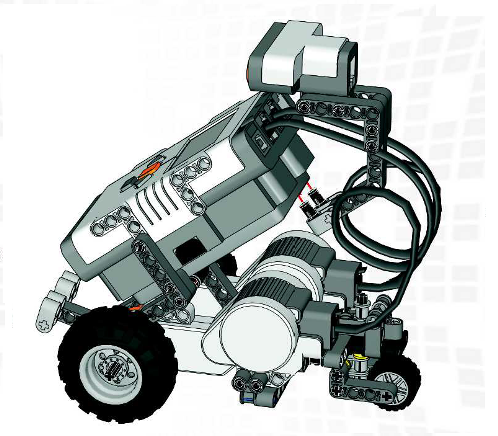 Ultrasonic sensor at the head of the robot
 Touch sensor at the back of the robot Root component
As mentioned before, the whole robot is the main component and acts as the root of all contained components.
First we will show a diagram of the main component, explain it and then jump into code.
The main component diagram is as follows:
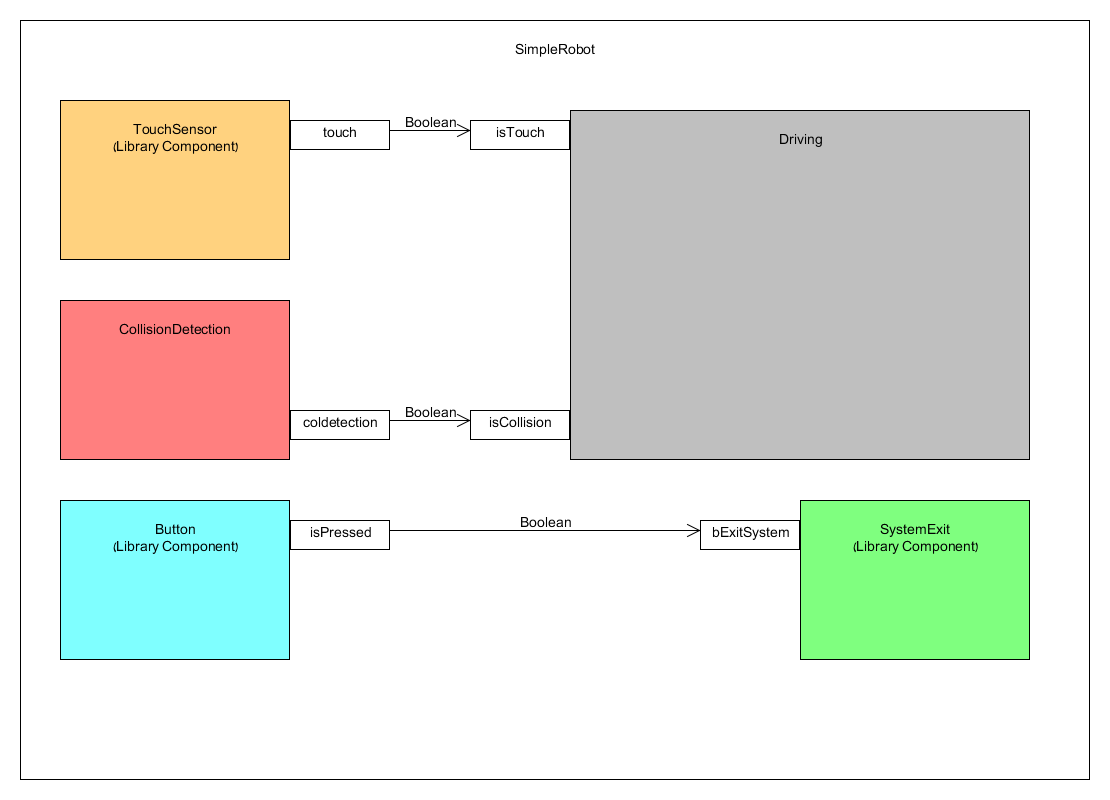
The big square is the Simple Robot main component. Every colored square in it is a sub component.
One can see that the simple robot has 5 sub components: TouchSensor, CollisionDetection, Button, SystemExit and Driving.
Note: on the diagram we write the type of the component. In the code we give the component a name - just like a variable which has a type and a name.
Every rectangle is a port. We usually place incoming ports at the left side of the component, and outgoing ports at the right.
Arrows are connections from outgoing port of one component to an incoming port of another.
On the arrow we write the type of the data (i.e. Boolean).
From the diagram we can understand that a press on a button (Button component) triggers the stopping of the robot (SystemExit component) and the port isPressed is a Boolean that tells SystemExit (via bExitSystem port) when it is pressed.
In addition, we can see that Touchsensor and CollisionDetection are components that feed the Driving componenet via isTouch and isCollision with two Booleans that tells when the ultrasonic sensor and the touch sensor detects collisions.
Important note: filename MUST be as the name of the component, with a .cmp extension.
SimpleRobot.cmp code:
package SimpleRobot;

import il.ac.tau.cs.smlab.model2lejos.library.wrappers.buttons.Button;
import il.ac.tau.cs.smlab.model2lejos.library.wrappers.touchsensor.TouchSensor;
import collisiondetection.CollisionDetection;
import il.ac.tau.cs.smlab.model2lejos.library.components.systemexit.SystemExit;
import driving.Driving;

/**
* Simple Robot
* @author Eran Habad
* @version 1.0
*/
<<Deploy>>component SimpleRobot {

	component Button(1)   enterButton;
	component TouchSensor(lejos.nxt.SensorPort.S1) touch;
	component CollisionDetection coldetection;
	component SystemExit   system;
	component Driving drivingcontrol;

	connect enterButton.isPressed  -> system.bExitSystem;
	connect coldetection.collision -> drivingcontrol.isCollision;
	connect touch.pressed          -> drivingcontrol.isTouch;

}
The package and imports lines, are "pure" java commands that will later be added to the component java file (which will be created by the compiler).
In our example we set the package to be SimpleRobot, and import the 5 components that we need for our robot.
The Button, TouchSensor and SystemExit are components from our library and are fully explained in the documentation of the library.
The component CollisionDetection is located in packge collisiondetection, and Driving componenet is located in driving package. These two components we build ourselves.
<<Deploy>> means that this is the main component of the robot (there is only one main componenet in a robot).
We declare on the component with its name and implement it inside { }. First, we declare on the sub-components with their type and give a name each.
Some of the components (usually the ones from the library) are initialized with an argument inside ( ) after type: 1 means the ENTER button, and lejos.nxt.SensorPort.S1 means that the touch sensor is connected to port 1 of the NXT brick.
We connect the ports of the sub-components using "connect". First "componentName.portName" is the out port, and followd by -> is the second "componentName.portName" for the in port.
You can see that the ports connections are identical to the diagram.
Now we move on to the sub components - CollisionDetection and and Driving.
Back to top
Collision Detection
Collision Detection is resposible for reading the range from the ultrasonic sensor every cycle, and notify using the collision port when a near object is detected ahead.
Component's diagram:
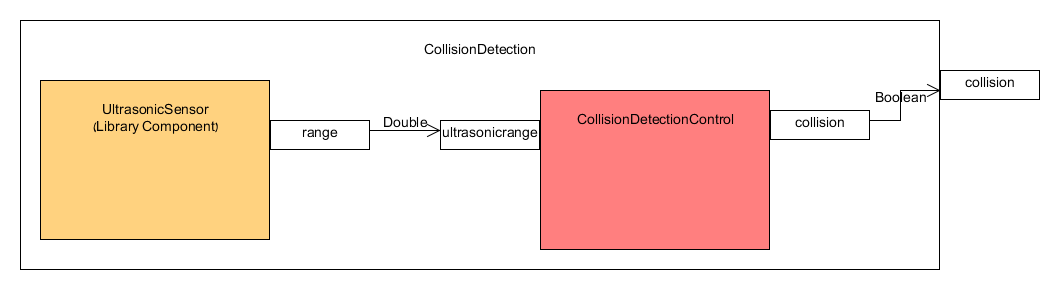
Component has 2 sub components: UltrasonicSensor is a library component that reads the ultrasonic sensor, and CollisionDetectionControl that receives the range detected and notifies whether it is near.
CollisionDetection.cmp code:
package collisiondetection;

import il.ac.tau.cs.smlab.model2lejos.library.wrappers.ultrasonicsensor.UltrasonicSensor;

/**
* Component responsible of collision detection
* @author Eran Habad
* @version 1.0
*/
component CollisionDetection {

	port
		out  Boolean    collision;

	component UltrasonicSensor(lejos.nxt.SensorPort.S4) ultrasonic;
	component CollisionDetectionControl cdc;

	connect cdc.collision -> collision;
	connect ultrasonic.range -> cdc.ultrasonicrange;

}
Package is collisiondetection. We import the UltrasonicSensor from component library.
We declare on an out port of type Boolean and call it collision.
Next, we declare on two components:
1. UltrasonicSensor - initialized with lejos.nxt.SensorPort.S4, which means that the sensor is connected to port 4.
2. CollisionDetectionControl.
We connect out port collision of component CollisionDetectionControl, to our collision out port, and
the range port from UltrasonicSensor to ultrasonicrange port at CollisionDetectionControl (just like diagram).
Collision Detection Control
This component is resposible for reading the ultrasonic range from its ultrasonic in port, and determine whether collision is ahead.
CollisionDetectionControl.cmp code:
package collisiondetection;

/**
* Component decides if collisision is in range
*
* @author Eran Habad
* @version 1.0
*/
component CollisionDetectionControl {

	port
		in  Double    ultrasonicrange,
		out  Boolean    collision;

}
We have one incoming port of type Double called ultrasonicrange, and one outgoing port of type Boolean called collision.
The compiler will generate from this cmp file a CollisionDetectionControl.java file, but the class in it will be Abstract, because we didn't specify any behavior to this component, and it has no sub-components in it.
The compiler is counting on us to build a file called CollisionDetectionControlImpl.java which will provide the compute function and implement the behavior of this component.
As we stated above, sometimes we implement components hard-coded using Java, if there's a special need and we can't use our component language to describe a behavior.
A hard-coded implementation of a component will be in a .java file that its name is like the component, in addition to Impl in the end.
CollisionDetectionControl was implemented hard-coded, and to do so we created a new class called CollisionDetectionControlImpl which extends CollisionDetectionControl and overrides the compute function:
CollisionDetectionControlImpl.java code:
package collisiondetection;

/**
 * Implementation of component CollisionDetectionControl
 * Responsible for determining if possible collision using range from ultrasonic sensor
 *
 * @author Eran Habad
 * @version 1.0
 */
public class CollisionDetectionControlImpl extends CollisionDetectionControl {

	@Override
	public void compute() {
		if ((this.ultrasonicrange != null)
				&& (this.ultrasonicrange.getCurrentValue() != null)) {
			// Get Values
			double range = this.ultrasonicrange.getCurrentValue();

			if (range<40)
				this.collision.setNextValue(true);
			else
				this.collision.setNextValue(false);
		}
	}
}
This file CollisionDetectionControlImpl.java should be placed (manualy!) in the folder CollisionDetection which will be generated by the compiler, along with all other .java files of the CollisionDetection package.
Back to top
Driving
Driving component is really the "heart" of the robot. It gets the information from the sensors and determines robot's behavior.
Let's take a look at the component diagram:
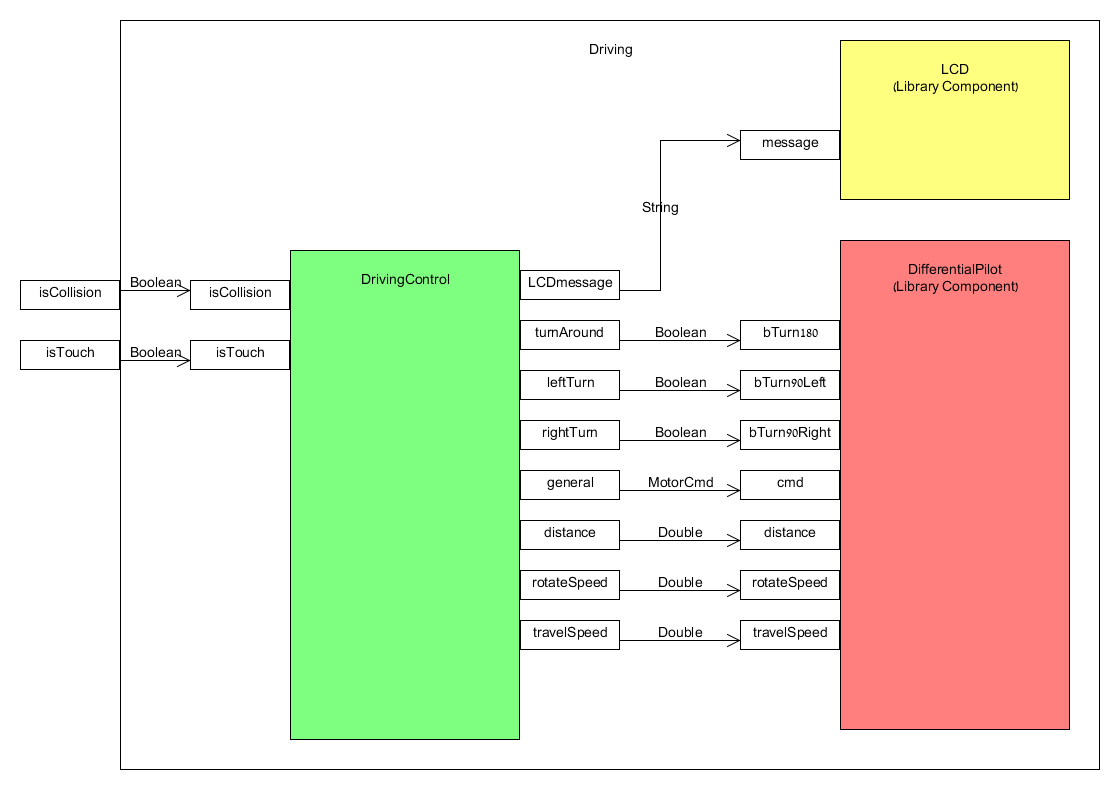
The component consists of 3 sub-components: LCD and DifferentialPilot which are library components, and DrivingControl component which holds a state machine for robot's driving.
LCD is used in order to display messages on the NXT screen, and DifferentialPilot is used for controling the motors (i.e. going forward, backward etc.).
Driving.cmp code:
package driving;

import il.ac.tau.cs.smlab.model2lejos.library.wrappers.differentialpilot.DifferentialPilot;
import il.ac.tau.cs.smlab.model2lejos.library.wrappers.lcd.LCD;

/**
* Component responsible for driving
* @author Eran Habad
* @version 1.0
*/
component Driving {

	port
		in  Boolean    isCollision,
		in  Boolean    isTouch;

	component DrivingControl controller;
	component DifferentialPilot(2.2, 2.2, lejos.nxt.MotorPort.C, lejos.nxt.MotorPort.A) pilot;
	component LCD lcd;

	// connect driving input ports to driving control input ports
	connect isTouch -> controller.isTouch;
	connect isCollision -> controller.isCollision;

	// connects ports between driving control and pilot
	connect controller.turnAround -> pilot.bTurn180;
	connect controller.leftTurn -> pilot.bTurn90Left;
	connect controller.rightTurn -> pilot.bTurn90Right;
	connect controller.general -> pilot.cmd;
	connect controller.distance -> pilot.distance;
	connect controller.rotateSpeed -> pilot.rotateSpeed;
	connect controller.travelSpeed -> pilot.travelSpeed;

	// connect message port bewteen driving control and LCD
	connect controller.LCDmessage -> lcd.message;

}
We set the package to driving and import LCD and DifferentialPilot from library.
DifferentialPilot is initialized with few arguments: diameter of left and right wheel, left and right motor ports.
DifferentialPilot is the component responsible for robot's driving, so we have Boolean ports for turns, Double ports for speeds and distances, and MotorCmd port for stop, forward and backward.
Fully documentation of all library components is available under "The Component Library".
From the diagram (and the code) we can see that DrivingControl is the "brain" of this component. It receives informtion about touch and collision, and operates DifferencialPilot and LCD.
Now, we take a futher step to DrivingControl where everything takes place.
Driving Control
As we stated, DrivingControl is the "brain" of the Driving component.
According to the touch and ultrasonic sensors, it determinds the actions of the robot.
It's implementaion is by a finite state automaton.
First, let's take a look at the state automaton (or state machine):
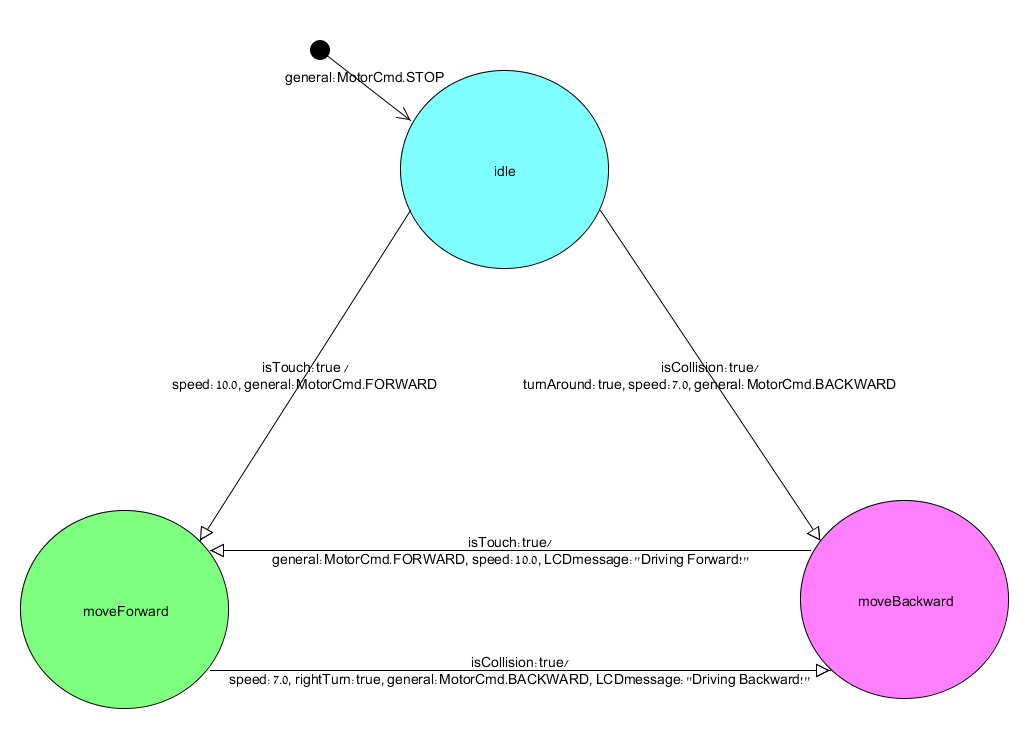
Circles are states, and the initial state has its unique sign (incoming arrow from black dot).
We can see that the robot has 3 states: idle, moveForward and moveBackwards.
Arrows represent transitions from one state to another, and written on it are event and actions, seperated by a "/".
For example: when robot first start, assign to general port the value MotorCmd.STOP.
When idle, if isTouch port is true (event), it means that touch sensor has been pressed. The actions to take are set speed port to 10.0 (cm per second), and set general port to MotorCmd.FORWARD which means set robot's speed to 10 cm/s and drive forward.
Rest behavior is for you to go through.
DrivingControl.cmp code:
package driving;

import il.ac.tau.cs.smlab.model2lejos.library.wrappers.differentialpilot.types.MotorCmd;

/**
* Component contains the driving state machine
*
* @author Eran Habad
* @version 1.0
*/

component DrivingControl {

port
	in	Boolean    isTouch,
	in	Boolean    isCollision,
	out	Boolean    leftTurn,
	out	Boolean    rightTurn,
	out	Boolean    turnAround,
	out	Double    distance,
	out	MotorCmd   general,
	out	Double     travelSpeed,
	out	Double     rotateSpeed,
	out	String	   LCDmessage;

	automaton DrivingControl {
		state
			idle [initial {general:MotorCmd.STOP}], //initial state. engine stop
			moveForward,
			moveBackward;

		// start with touch sensor
		idle -> moveForward   	{isTouch:true}
					/
					{travelSpeed:10.0, general:MotorCmd.FORWARD };

		// start with ultrasonic sensor
		idle -> moveBackward  {isCollision:true}
					/
					{turnAround:true, travelSpeed:7.0, general:MotorCmd.BACKWARD };

		// if collision detected, move backward
		moveForward -> moveBackward  {isCollision:true}
					/
					{travelSpeed:7.0, rightTurn:true, general:MotorCmd.BACKWARD,
					LCDmessage:"Driving Backward!" };

		// if touch detected, move forward
		moveBackward -> moveForward  {isTouch:true}
					/
					{general:MotorCmd.FORWARD, travelSpeed:10.0, LCDmessage:"Driving Forward!"};

	}

}
We declare on the package, and import the MotorCmd type in order to use the port that commands the engine.
We use "automaton DrivingControl" to declare on the automaton, and implement it inside { }.
We define the states: idle, moveForward and moveBackward and set the idle the initial using [initial].
To perform an intial action(s) we use { } inside the [initial]. In our case we set the general port to MotorCmd.STOP in order to stop the motors.
We specify the transitions between the states. For each transition we write the state and a state to move to using -> , For example: idle -> moveForward .
We note the event in { } - the event means that only if it is true and we're in relevant state, the transition will take place.
Followed the event is a "/", and afterwards are the actions to take in { }.
For example: if we're in moveBackward and isTouch is true (touch is pressed), set general to MotorCmd.FORWARD, speed to 10.0, and LCDmessage to "Driving Forward!".
The outcome will be that robot's speed is 10.0 cm/s, LCD displays "Driving Forward!", and the robot drives forward.
Back to top
Download SimpleRobot Files
You can download the files of the SimpleRobot from this link for your own convenience.
Back to top
|